Introduction
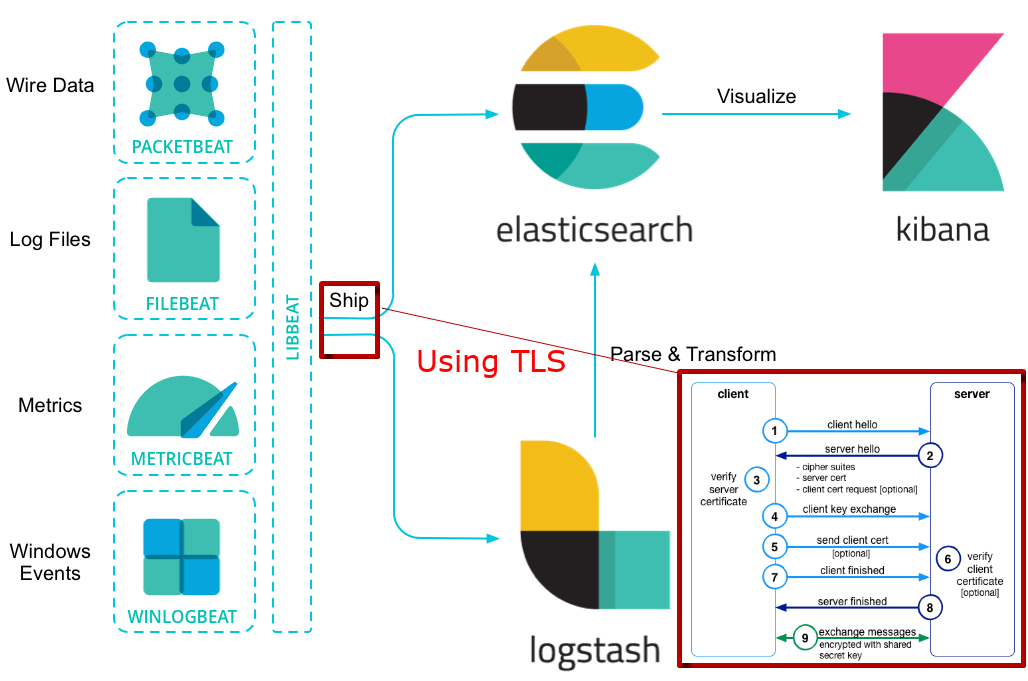
At work, we decided to give a try to the Elastic Stack (Elastic Search, Logstash and Filebeat in our case) while having the whole communication secured with TLS.
TLS Protocol
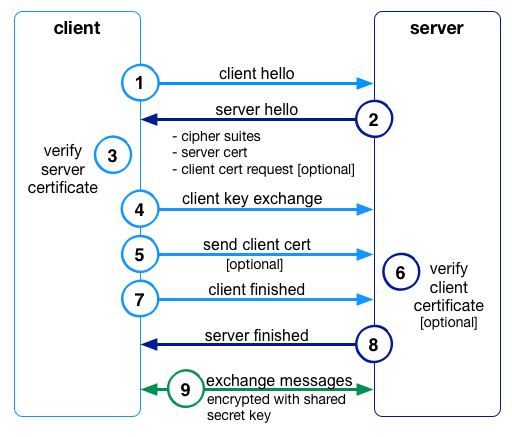
You might at this point wonder how all the communications could be encrypted when only the server would have the information to decrypt. This is where the TLS handshake comes in, which is best explained with the picture below.
Explanation
To start this handshake, the client must make a request to connect to the server (1). The server then responds with a certificate (2), which the client is then responsible for validating / trusting the server’s identity as mentioned earlier (3).
Optionally, the server can also ask for a client certificate if you wanted the additional security where the server must also trust the client (4). Using the public key of the server the client creates a new symmetric key, the shared secret key, which only the client has knowledge of at this point. It encrypts this shared key using the public key of the server, which allows the server to receive this new shared key and decrypt (5).
At this point the shared key is now only known to the client and server (7)(8), and can be used for encrypting and keeping the traffic private between the two parties (9).
Source: https://www.elastic.co/blog/tls-elastic-stack-elasticsearch-kibana-Logstash-filebeat
Setup
- A Logstash instance to analyze the logs entries
- A filebeat instance that gathers the lines of logs
- Have docker installed on your own machine to run the certificate generator
Configuration
The first part is to setup gather the information about your servers like IP addresses and hostname. You’ll need this to configure correctly the instances configuration file that will be used to generate the needed certificates and keys.
Instances.yml
This is the default configuration file where you describe each of the servers that will run a piece of the Elastic Stack. This file will be used to generate the certificate and keys and bind them to the IP and DNS hostname you set.
Generate CA/Certs
This script will take care of downloading for you the latest (at the time of writing 5.6.4) version of ElasticSearch with X-Pack installed using Docker. One this is done, it will generate the CA (if it doesn’t exist already) and the different certs with their key pair as configured in the instance.yml file.
There is a little subtility in the script about Logstash. All the key file be present in two format, the usual PEM (.key) and the PKCS8 (.key.p8). The PKCS8 is used by Logstash, it doesn’t accept the PEM format.
Parameters
- Which file to use (default instaces.yml)
- How many days before expiration (default 100 years)
- How strong the key is (default 4096 bits)
Script
Certs/Keys
You’ll find all the different certificates in the folder certificates.They are sorted by the name your set in the instance.yml. In the folder ca you’ll find the Certificate Authority key and certificate.
You’ll need to transfer the following files to your servers. I advise creating a ssl folder in your configuration folder (like /etc/logstash/ssl).
- ca.crt : the Certificate of your Certificate Authority
- my-server.key: the key for your server
- my-server.crt: the certificate for your server.
Logstash
I consider that you have already setup your Logstash instance and only want to add the TLS setting to work with FileBeat. I’ll do another guide that explains how to setup Logstash.
Configuration
In your configuration with the definition of the beat input add those parameters. Only pay attention to the ssl_ parameters. The verify mode is to force the beats clients to connect with a valid certificate.
input {
    beats {
        port => "5033"
        ssl => true
        ssl_certificate_authorities => ["/etc/logstash/ssl/ca.crt"]
        ssl_certificate => "/etc/logstash/ssl/logstash.crt"
        ssl_key => "/etc/logstash/ssl/logstash.key.p8"
        ssl_verify_mode => "force_peer"
    }
}
FileBeat
I consider that you have already setup your FileBeat instance and only want to add the TLS setting to work with FileBeat. I’ll do another guide that explains how to setup FileBeat with Logstash.
Configuration
Find in the configuration file where you setup the connection to Logstash and add the information abut the SSL connection.
output.logstash:
  # The Logstash hosts
  hosts: ["logstash.my-domain.com:5033"]

  ssl.certificate_authorities: ["/etc/filebeat/ssl/ca.crt"]
  ssl.certificate: "/etc/filebeat/ssl/filebeat-node1.crt"
  ssl.key: "/etc/filebeat/ssl/filebeat-node1.key"

  # Optional SSL. By default is off.
  # List of root certificates for HTTPS server verifications
  #ssl.certificate_authorities: ["/etc/pki/root/ca.pem"]

  # Certificate for SSL client authentication
  #ssl.certificate: "/etc/pki/client/cert.pem"

  # Client Certificate Key
  #ssl.key: "/etc/pki/client/cert.key"
Conclusion
Restart the services and the FileBeat instance is now connecting using TLS to the Logstash instance.
If you want a detailed guide on how to setup TLS for ElasticSearch Node follow this official guide by elastic. You can easily adapt it to use my script to generate your certificates.
26th November 2017 at 13:27
Its an excellent article Antoine , how to create TLS communication in a centralised server,where all elasticsearch,logstash and kibana are in same server ? , then if am going to use beats , i could create crt for it as well