Introduction
The basic advice you’ll see everywhere on the web is to always use a VPN for your torrenting needs. To avoid any possible way to track your client and its localization.
VPN
You have multiple VPN protocol that exists, going from IPsec with LT2P, OpenVPN to Wireguard. This guide is going to focus on Wireguard.
Wireguard
WireGuard® is an extremely simple yet fast and modern VPN that utilizes state-of-the-art cryptography. It aims to be faster, simpler, leaner, and more useful than IPsec, while avoiding the massive headache. It intends to be considerably more performant than OpenVPN. WireGuard is designed as a general purpose VPN for running on embedded interfaces and super computers alike, fit for many different circumstances. Initially released for the Linux kernel, it is now cross-platform (Windows, macOS, BSD, iOS, Android) and widely deployable. It is currently under heavy development, but already it might be regarded as the most secure, easiest to use, and simplest VPN solution in the industry.
WireGuard website
This Guide is going to focus on how to set up a Wireguard Client, a Network Namespace and having only your desired application having its traffic redirected to your VPN server / provider.
Network Namespace
With network namespace you are able to create a full virtual network stack directly in your OS. This feature of the Linux kernel is used by Docker and other container engine. The idea being, you can segregate a full network out of the one of your host.
This tutorial is going to rely on this feature to be able to have a network that will redirect all its traffic to Wireguard VPN.
Creating Namespace
First thing first, we need to create the namespace. To interact with the namespace feature of the Linux Kernel we’re going to use the ip tool.
Important tip: all the commands we're going to use need to be run as root. Either run a shell with root, or prepend them with sudo.
ip netns add vpn
Creating Virtual Ethernet Interfaces
To be able to connect our root namespace where you have internet access to our VPN namespace where you don’t have it, we need a virtual interface.
You can see below a quick schema with our 2 namespaces and the 2 virtual interfaces we’re going to create.
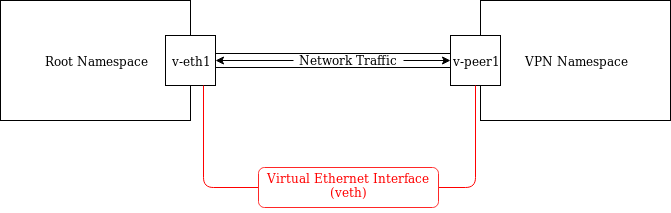
# create the interface
ip link add v-eth1 type veth peer name v-peer1

# add the v-peer1 to the namespace vpn
ip link set v-peer1 netns vpn

# set IP to the interface in root namespace
ip addr add 10.200.1.1/24 dev v-eth1

# make the interface active
ip link set v-eth1 up

# add ip to the interface in the vpn namespace with a corresponding netmask.
ip netns exec vpn ip addr add 10.200.1.2/24 dev v-peer1

# make the interface active
ip -n vpn link set v-peer1 up

 # add a loopback interface in vpn namespace
ip -n vpn link set lo up

# make the traffic in vpn namespace go to root namespace through veth
ip -n vpn route add default via 10.200.1.1
Great, now you have a namespace configured and a link between the two namespace. We need now to use iptables to let use forward traffic into our virtual interfaces.
Traffic Forwarding between veth
First you need to tell the kernel to enable IP Forwarding.
Enable IP-forwarding.
echo 1 > /proc/sys/net/ipv4/ip_forward
echo "net.ipv4.ip_forward = 1" >> /etc/sysctl.conf
Iptables
# Flush forward rules, policy DROP by default.
iptables -P FORWARD DROP
iptables -F FORWARD

# Flush nat rules.
iptables -t nat -F

# Enable masquerading of 10.200.1.0.
iptables -t nat -A POSTROUTING -s 10.200.1.0/24 -o eth0 -j MASQUERADE

# Allow forwarding between eth0 and v-eth1.
iptables -A FORWARD -i eth0 -o v-eth1 -j ACCEPT
iptables -A FORWARD -o eth0 -i v-eth1 -j ACCEPT

# Allow all output traffic
iptables -P OUTPUT ACCEPT
DNS Configuration
You can configure the DNS server that will be used by the applications in your namespace. In my case, I’m using those of CloudFlare.
mkdir -p /etc/netns/vpn
echo "nameserver 1.1.1.1" > /etc/netns/vpn/resolv.conf
echo "nameserver 1.0.0.1" >> /etc/netns/vpn/resolv.conf
Test namespace
You should be able to ping the outside world now. If it doesn’t work something must be wrong with your iptable configuration.
ping 1.1.1.1
Wireguard Client
Now that you have your VPN namespace that can access the internet, we only need to use wg-quick tool provided by wiregard to initialize our connection to the server.
You’ll see the usual command prepended by
ip netns exec vpnThis is to tell the OS to use our namespace to run the wanted program. In this case, wg-quick.
ip netns exec vpn wg-quick up NAME_OF_CONFIG_FILE
Run your client
And here is the last part, I’m sure you already have an idea on how to do this part.
Basically, we want the OS to run our app the in VPN Network Namespace, the same way we wanted wg-quick to run.
Only small difference, we don’t want the torrent client to run as root, this is dangerous. We’re going to use root to run the ip tool and runuser to run the application as the wanted user.
sudo ip netns exec vpn runuser $USER -c "MY_TORRENT_CLIENT_COMMAND"
4th December 2019 at 15:40
This is the solution i was looking for long time.I made a shell-script doing this and extended it with a iptables kill-switch. see https://gitlab.com/snippets/1919418
3rd March 2023 at 14:30
Hi,
Would this work if I use this on a headless Raspberry Pi 4B running the official 64-bit OS?:
– qBittorrent with GUI
– This easy setup from Mullvad VPN: https://mullvad.net/sv/help/easy-wireguard-mullvad-setup-linux/
If so would qBittorrent direct all its traffic through the Wireguard connection to Mullvad’s servers while leaving everything else like SSH, RealVNC (remote desktop software) and SFTP accessible like normal?
3rd March 2023 at 14:32
Hey Alex,
For that usecase, it’s even easier to use Docker directly with this image: https://hotio.dev/containers/qbittorrent/
You have everything build-in, wireguard and support for wireguard VPN.
3rd March 2023 at 14:36
Hi and thanks for the quick reply!
I know Docker is easier in several regards but I’m more comfortable with interacting with qBittorrent graphically (hence RealVNC and a virtual desktop).
Would your guide still work for what my original post describes?
3rd March 2023 at 14:38
The docker container provide access to the Web UI that is 100% the same as the GUI.
This container comes with a better UI: https://github.com/WDaan/VueTorrent
Super simple to use.
No need to use VNC and virtual desktop.
And to answer your question, since you want to use the GUI version, I’m not sure if it’ll work.
3rd March 2023 at 14:44
I understand that argument but with RealVNC I can more easily access the Raspberry Pi running it from outside my home network without some other setup.
I know this sounds weird to experienced network people but I would still like to know whether my idea is viable regardless of whether it is unnecessary compared to any browser-based Web UI.
3rd March 2023 at 16:17
I think I made it work, how would I check whether it actually routes the traffic from qBittorrent through the right connection?
3rd March 2023 at 16:19
@alex, you can try with this service:
https://torguard.net/checkmytorrentipaddress.php
It takes a moment when you put the torrent to download, but you should be able to see your IP appear.
As long as it’s the mullvad one and not yours, you’re golden.
3rd March 2023 at 16:40
I get this from the link you gave me:
03.03.2023 22:38:06 89.36.78.168 qBittorrent/4.2.5
03.03.2023 22:37:41 89.36.78.168 qBittorrent/4.2.5
03.03.2023 22:37:01 89.36.78.168 qBittorrent/4.2.5
03.03.2023 22:35:31 89.36.78.168 qBittorrent/4.2.5
I take that it is good since that address is not my public IP from my ISP?
4th March 2023 at 06:46
New issue:
When I run “sudo apt update” I get a few errors:
“pi@raspberrypi:~ $ sudo apt update
Err:1 http://archive.raspberrypi.org/debian bullseye InRelease
Temporary failure resolving ‘archive.raspberrypi.org’
Err:2 http://deb.debian.org/debian bullseye InRelease
Temporary failure resolving ‘deb.debian.org’
Err:3 http://security.debian.org/debian-security bullseye-security InRelease
Temporary failure resolving ‘security.debian.org’
Err:4 http://deb.debian.org/debian bullseye-updates InRelease
Temporary failure resolving ‘deb.debian.org’
Reading package lists… Done
Building dependency tree… Done
Reading state information… Done
All packages are up to date.
W: Failed to fetch http://deb.debian.org/debian/dists/bullseye/InRelease Temporary failure resolving ‘deb.debian.org’
W: Failed to fetch http://security.debian.org/debian-security/dists/bullseye-security/InRelease Temporary failure resolving ‘security.debian.org’
W: Failed to fetch http://deb.debian.org/debian/dists/bullseye-updates/InRelease Temporary failure resolving ‘deb.debian.org’
W: Failed to fetch http://archive.raspberrypi.org/debian/dists/bullseye/InRelease Temporary failure resolving ‘archive.raspberrypi.org’
W: Some index files failed to download. They have been ignored, or old ones used instead.”
What can be done to remedy this?
18th March 2024 at 14:24
Hi and thanks for this solution.
Totally newbie here so I’m about to ask a very stupid question (sorry).
I installed this on my VPS:
https://github.com/YouROK/TorrServer
It works but my vps is in Usa and I’d like to redirect all it’s traffic (Tottserver is on port 9119) to a NordVPN wireguard interface (a peer ‘client’ is on local port 51291).
Can this guide be used to accomplish that?
Thanks.
23rd November 2024 at 03:43
Hi, I’m trying to get opened port for my torrent and some other apps, my setup is: one modem/router giving internet to two desktops, desktop1 is the wg server (192.168.0.2/10.0.0.1), desktop2 is the wg peer (192.168.0.3/10.0.0.2), both machines are in my home, all works good but the apps like Transmission show closed port (say 12345/tcp) if I use it while my desktop2 is connected to the wg tunnel and it show the port open if my desktop2 is not connected to the wg tunnel and I open the port 12345/tcp in the router for 192.168.0.3.. In the server the net.ipv4.ip_forward=1 is active in /etc/sysctl.conf and the wg port, say 23456/udp is open in the router and in the server’s firewall.. The wg peer use AllowedIPs = 0.0.0.0/0 in it wg config file.. The server wg config file use the following rules:
PostUp = iptables -A FORWARD -i %i -j ACCEPT; iptables -A FORWARD -o %i -j ACCEPT; iptables -t nat -A POSTROUTING -o eth0 -j MASQUERADE
PostUp = iptables -t nat -A PREROUTING -i %i -p tcp –destination-port 12345 -j DNAT –to-destination 10.0.0.2
Both desktops run Debian 12.. My networking understanding is practically nothing and I setup everything by different tutorials that I research all over the internet.. What can I be missing?
In the other hand, if I want to try this option, do I have to set this up in the desktop2 just as you explain it and that’s it? or do I have to use a different wg0.conf file (wg1.conf?) or change something on any of the desktops?
Thank you!