If you’re looking for an easy setup, checkout my review of NextDNS: DoT and DoH provider for easy ADBlocking.
This guide will help you reuse your setup for DNS-over-HTTPS (DoH) to add support for DNS-over-TLS (DoT). The best part ? You won’t need new tools after you’ve followed my previous guides: DNS-over-HTTPS or Pihole and DoH.
Introduction
DNS-over-TLS (DoT) is different to DNS-over-HTTPS (DoH).
DoH is used in different application like DNScrypt, Intra, etc … In other words, there isn’t any OS implementation of it. You always need a separate app to use it.
DoT is used directly in Android 9 (Pie).
It’s important to note that in both case the traffic will be encrypted and your ISP or any company between you and the server won’t be able to see what are your DNS request. It’s only 2 different ways to do the same thing.
Disclaimer
This tutorial relies heavily on using Letsencrypt certificate. However, if you have an old Android device (before 10) it might not work because their CA certificate has been rotated. Your android device won’t recognize it and won’t let you use your Private DNS.
If it’s the case, you’ll need to find another provider for the certificate. Or use an updated application like Intra.
DNS-over-HTTPS (DoH)
In DoH, you’re using an HTTPS server to relay the DNS request to your DNS server. The request are encoded in a specific format, usually in JSON.
For more information, I advise you to check my DNS-over-HTTP Tutorial.
DNS-over-TLS (DoT)
DNS over TLS (DoT) is a security protocol for encrypting and wrapping Domain Name System (DNS) queries and answers via the Transport Layer Security (TLS) protocol. The goal of the method is to increase user privacy and security by preventing eavesdropping and manipulation of DNS data via man-in-the-middle attacks.
Wikipedia
Basically, you’re going to encapsulate DNS traffic into a TLS stream to encrypt the request and use TCP instead of UDP. The default port is 853.
Tutorial
If you’ve followed already my guide on how to setup DoH, you have everything you need.
If you didn’t, I advise you to follow it to be able to easily generate an HTTPS certificate with Certbot. If you already have a certificate, great, you’re good to go.
If you don’t have a certificate ready, I recommend you to set it up with Certbot and DNS validation (like with CloudFlare) or to follow the DoH guide.
NGINX
NGINX is an amazing tool, not only it’s an HTTP server but can be used to encapsulate any stream into a TLS stream. This is exactly what we want.
Streams
First, you’ll need to create a new directory in your NGINX install directory to store the stream configuration.
sudo mkdir /etc/nginx/streams/
TLS
Now get from the DoH NGINX’s site configuration file the path to your HTTPS key and certificate.
If you used Certbot, it’s gonna look like this where dns.aaflalo.me will be your domain.
ssl_certificate /etc/letsencrypt/live/dns.aaflalo.me/fullchain.pem; # managed by Certbot
ssl_certificate_key /etc/letsencrypt/live/dns.aaflalo.me/privkey.pem; # managed by Certbot
ssl_dhparam /etc/letsencrypt/ssl-dhparams.pem; # managed by Certbot
Now that you have the SSL configuration, we’re gonna create the stream configuration to redirect DoT traffic to your DNS server.
DNS-over-TLS
We create the dns-over-tls configuration and then you’ll use your favourite editor to set the content.
/etc/nginx/streams/dns-over-tls
upstream dns-servers {
     	server    127.0.0.1:53;
}

server {
	listen 853 ssl; # managed by Certbot
	ssl_certificate /etc/letsencrypt/live/dns.aaflalo.me/fullchain.pem; # managed by Certbot
	ssl_certificate_key /etc/letsencrypt/live/dns.aaflalo.me/privkey.pem; # managed by Certbot
	ssl_dhparam /etc/letsencrypt/ssl-dhparams.pem; # managed by Certbot


	ssl_protocols        TLSv1.2 TLSv1.3;
	ssl_ciphers          HIGH:!aNULL:!MD5;

	ssl_handshake_timeout    10s;
	ssl_session_cache        shared:SSL:20m;
	ssl_session_timeout      4h;

	proxy_pass dns-servers;

}
I’ve highlighted the lines (2, 7, 8) you need to change for your own configuration. The server in dns-servers need to point to the DNS server you want to use. May it be your Pihole, or your DNSCrypt server, etc … You can put multiple server as well.
Activate Streams
Now the last step, is to tell NGINX to look into our /etc/nginx/streams folder to activate the stream.
Edit the file /etc/nginx/nginx.conf
And add the following piece of code into the file, after the HTTP block (or just at the end of the file)
stream {
        include /etc/nginx/streams/*;
}
Now you just need to restart NGINX, and you’ll have a DoT server listening on the port 853.
sudo systemctl restart nginx
Firewall
Don’t forget to open the TCP port 853 on your firewall to be able to access the server.
Test
To test your DoT server, you can use the service provided by GetDNS.
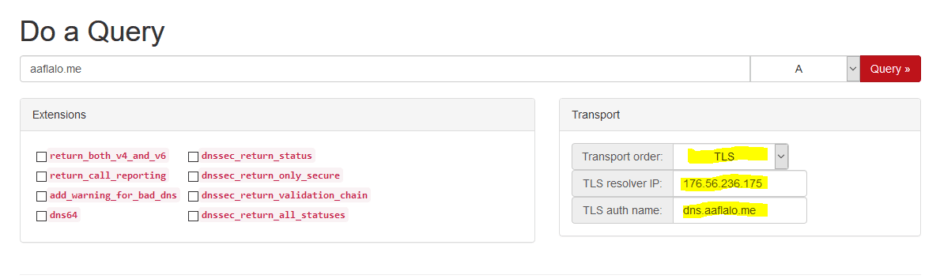
How to use the Querier
- Set Transport order
Set it to TLS
- Set TLS resolver IP
To the Public IP of your server
- TLS auth name
To the FQDN (full name) of your server certificate. The one you used to generate the TLS certificate.
- Query
Put the domain you want to query, like aaflalo.me or google.com and select A query.
- Push the button
And check that there is a result
7th March 2019 at 05:50
Hi Antoine,
The test of getdnsapi shows
An error occurred: 1 ‘Generic error’
What next?
7th March 2019 at 17:47
Hello Albert,
When you’ve configured the stream, did you put the IP of your DNS server (if you follow the pihole guide, it should be 127.0.0.1:53) ?.
Also what happens when you do: sudo nginx -t ?
7th March 2019 at 18:54
Hi Antoine,
You found the problem thanks a lot
(if you follow the pihole guide, it should be 127.0.0.1:53) ?.
That was it I missed to modify /etc/nginx/streams/dns-over-tls
Thanks for your superb work.
12th March 2019 at 11:13
Hi, I followed your guides and it works great, thanks.
I have only a problem, before I was using pihole on vps via port 53 on my fritzbox to my home line (all firewalled, only my home ip can access port 53).
Now pihole via 53 doesn’t work anymore, I get cloudfire dns via port 53 but no ad blocking so I assume I’m using dnscrypt instead of pihole. Do you have any idea how to solve? Thanks.
12th March 2019 at 14:47
Hello,
For DoT, the port isn’t 53 UDP but 853 TCP. You’ll have to edit your firewall rules for it to work.
14th March 2019 at 13:50
I know, I was wondering if dnscrypt-proxy was the cause of my problem but it seems that it’s not because I disabled dnscrypt and used pihole without it… The result is the same… Don’t know why I have this result, I think I’ll try to redo all hoping it will work…
2nd June 2019 at 06:25
Thanks so much for writing the 3 part tutorial, that must have been a lot of work. I set up everything on google cloud following your instructions and it works with Android 9 pie on my phone. The only thins is performance is quite slow, but I am not sure why. I get 25ms to the google cloud server, and cpu usage is very low. I’ll play around with some settings to see if I can get better performance.
3rd June 2019 at 07:52
Well I just changed the upstream dns in the pihole to google’s and the speed is good, Changed it from 127.0.2.1.
28th July 2019 at 02:55
Thanks for Three great tutorial.
Is there any way to add DNSSEC to Server ?
I use Digital Ocean, which is not implemented DNSSEC yet.
29th July 2019 at 00:27
Hello Fariz,
For having DNSSEC you have multiple choice.
Either you use a server that supports it (like cloudflare, google, etc …) or you setup a unbound server where you have DNSSEC configured.
31st July 2019 at 13:52
Thanks for the brilliant tutorial.
When I go to see the TLS clients using my server, Pihole only shows them as “localhost”. That sounds quite obvious as the stream is redirecting them all through the localhost.
But using OpenVPN too and OpenVPN does send that information to Pihole as different clients (ie: 10.8.0.2, 10.8.0.3).
How could I make the stream to give what TLS clients that are accessing my server to Pihole as OpenVPN do?
5th August 2019 at 19:27
For the TLS stream, I don’t know. This is completely managed by NGINX and their implementation of the stream.
For what I can find online, you could set the set_real_ip_from to force the IP. But again, I didn’t very the information.
https://stackoverflow.com/questions/40873393/nginx-real-client-ip-to-tcp-stream-backend
11th December 2019 at 18:15
Absolutely great guide!!
I setup my own DoT-Pihole server on VPS, works great.
To fix 127.0.0.1 client issue on pihole, I tried adding the “set_real_ip_from” field, but gave me the following error:
nginx: [emerg] “set_real_ip_from” directive is not allowed here in /etc/nginx/streams/dns:15
nginx: configuration file /etc/nginx/nginx.conf test failed
Any recommendations? I’m don’t have much of web development experience but can’t figure out how to fix this.
30th December 2019 at 16:59
I was to get this working by using help from this website – https://www.nginx.com/blog/ip-transparency-direct-server-return-nginx-plus-transparent-proxy/
===============================================================================
===============================================================================
# Edit DNS-Over-TLS server block at /etc/nginx/stream/dns-over-tls
# Replace upstream IP with your server’s Interface IP
server [X.X.X.X]:53;
# Add the NGINX Proxy Bind to the server block
proxy_bind $remote_addr transparent;
===============================================================================
# Run NGINX as Root, instead of www-data
sed -i ‘s/www-data/root/’ /etc/nginx/nginx.conf
===============================================================================
# Add IPtables marking rules to tag DNS response packets
ip6tables -t mangle -A OUTPUT -p tcp –sport 53 -j MARK –set-xmark 7
iptables -t mangle -A OUTPUT -p tcp –sport 53 -j MARK –set-xmark 7
===============================================================================
# Add IP rules to divert DNS response packets to NGINX
# IPv4
ip -6 rule add fwmark 7 lookup 99
ip -6 route add local ::/0 dev lo table 99
# IPv6
ip rule add fwmark 7 lookup 99
ip route add local 0.0.0.0/0 dev lo table 99
===============================================================================
# Restart NGINX service
service nginx restart
===============================================================================
# Save IP6tables & IPtables rules
ip6tables-save
iptables-save
===============================================================================
20th January 2020 at 17:17
It’s a possible solution, but I highly recommend against because of the need to have nginx running as root.
It would be easier and more secure to intercept the traffic with iptable going to 853 and log it instead of running nginx as root and redirecting packets.
27th January 2020 at 06:46
Hello There,
I tried all your steps but i can’t get it up & working.
after doing all the steps i can’t even connect to my DNS Server via Android Private DNS + nginx can’t connect to the local upstream dns server too. its keep getting timed out.
when running below cmd
== ip6tables -t mangle -A OUTPUT -p tcp –sport 53 -j MARK –set-xmark 7 ==
i get below error
—————————
Bad argument `–sport’
Try `ip6tables -h’ or ‘ip6tables –help’ for more information.
——————
Note i am using Ubuntu in a VM
And recently i created a simple script which can setup PI-Hole to work with
Android Private DNS
https://github.com/varunsridharan/pi-hole-android-private-dns
and this would be a great addition for my script.
13th October 2019 at 19:22
Great Tutorial!
Sorry for the noob question as I am a little bit confused, but how do you get a “provider public key” when using Let’s Encrypt/Certbot? I am asking because I am missing that part to generate a Stamp (SDNS) by using my domain name (Provider Name) & server IP address. Also, does SDNS need to be in registrar records as well?
Thank you!
15th October 2019 at 15:56
Hello Fred,
I had the same issue before as you can see here: https://github.com/DNSCrypt/dnscrypt-resolvers/pull/27
Do a SDNS without the hash, then run dnscrypt with the environment variable SHOW_CERTS=true
It will show you this:
Then take the one about let’s encrypt root cert.
17th October 2019 at 20:52
Hey Antoine,
the result from getdnsapi shows “GETDNS_RESPSTATUS_ALL_TIMEOUT”
Can you help me?
17th October 2019 at 21:33
Hello Zuhri,
Do you have nginx running ?
Is it listening on the 853 TCP port ?
Do you have any firewall between the internet and your nginx server ?
If you’re behind a router, did you set up port forwarding ?
8th November 2019 at 07:37
So, i have a VPS on which i run my ‘dev’ containers.. not really though but still, funny to have.
At first, i was using PiHole as a docker too, but that was giving me too much clients. Since docker uses its own IP tables, they dont show up in UFW. That’s when i decided to run PiHole on the VPS itself so i can limit who could use the PiHole with UFW. This gave me a challenge to get this whole DoT setup working, but i managed to get it done!
Using:
– letsencrypt docker from linuxserver.io
– ‘baremetal’ pihole
– ‘baremetal’ doh-server
What i had to do:
– check network used by docker (172.18.0.0/16) and use that gateway adress (172.18.0.1)
– modify /etc/dns-over-https/doh-server.conf and add the gateway as listen adress
# HTTP listen port
listen = [
“127.0.0.1:8053”,
“[::1]:8053”,
“172.18.0.1:8053”,
]
– modify the pihole.subdomain.conf file. At top i added:
upstream dns-backend {
server 172.18.0.1:8053;
}
and near the bottom add new location for /dns-query after the /admin block
I think that was all i had to do, but have tried so many things! But its working now!
Will try to write this on my blog as well, and link to yours if you don’t mind! 🙂
30th December 2019 at 03:42
Hi Antoine,
Could you kindly share how to setup Fail2ban to protect port 853 from any potential spamming/ddos?
20th January 2020 at 17:10
I’d advise to set up rate limiting with nginx.
That’s what I’ve done with my public servers.
for DoT : http://nginx.org/en/docs/stream/ngx_stream_limit_conn_module.html
for DoH: https://www.nginx.com/blog/rate-limiting-nginx/
7th March 2020 at 08:13
Would you be so kind to give an example of how that would look in this context?. I get the logic by reading the nginx docs, but I don’t want to mess up.
30th December 2019 at 04:20
Thanks so much for this! I have setup and confirmed it is working through the browser/Firefox. However how can we utilise this on routers/Windows/Android? When I add my server (dns.mysite.com) on my Android device, it says ‘couldn’t connect’.
20th January 2020 at 17:11
Did you try with getdns at the end of the tutorial ?
It should help you debug.
9th January 2020 at 16:28
Can we setup client authentication on Android 10, so only my phone can use my DNS-over-TLS server ?
20th January 2020 at 17:08
It is possible, but you’ll need to implement an IP Block and be sure your phone IP never change or keep the IP block up-to-date.
7th March 2020 at 08:07
Thank you so much!
Up until now I had used dot-de.blahdns.com, but that blocked Google Maps Location History, so I had to stop. With DoT at home I am now in control over what is allowed or blocked!
Worth noting that this line could cause conflict, if the same shared session name is already used elsewhere in the nginx setup.
ssl_session_cache shared:SSL:20m;
21st May 2020 at 02:38
Thanks for a greate guide, or actually three.
I was running a Pi-Hole server at home before I found your guides.
I was looking for a way to get my Android 10 phones to use Pi-Hole even when I’m on the run (out of home)
So what I did was that I started a new VM on my ESXi server at home. I followed the steps in guide 1 for DNS over HTTPS, instead of installing the the Pi-Hole on the same server I pointed upstream in /etc/dns-over-https/doh-server.conf to my Pi-Hole server.
I then followed the guide for DNS over TLS.
I run a pfSense firewall, and created a NAT for port 853 from my WAN interface to my DoT server.
Edited the Private server in my Android Phone, and it worked perfekt, until I got home and my phone connected to my WiFi network.
I have an external DNS at Cloudflare and I run an internal DNS for ActiveDirectory with the same domain name.
I created the A record for dot.mydomain.net at cludflare pointing to my pfSense firewall, and I created the A record for dot.mydomain.net in my internal DNS pointing to my DoT server internal address.
My Pi-Hole uses my Active-Directory DNS for upstream lookups for now, and the AD DNS usese Cloudflare for upstream lookups.
My phones uses DynDNS, and there are rules in my pfSense that only allow my phones to access DoT server from the Internet.
My question is, why does it work when my phone is connected directly to the Internet, through my firewall.
But as soon as I connect to my WiFi at home, the settings for Private DNS in Android 10 say Can not connect (but in Swedish).
Obviosly the DNS over TLS works, but as soon as I am localy connected, it refuses to work.
Any Sugestions?
Regars Peter!
21st May 2020 at 20:20
Hello Peter,
To troubleshoot, I would check the traffic send to the Nginx server (Nginx Stream Log) to see if the request reach the server when you’re connected on the LAN.
I would think you might have some routing issue in your PFSense installation which would disallow your phone from contacting (using 853 TCP) the Nginx server.
Using Openssl, you should be able to replicate a DNS-over-TLS to your nginx server (https://medium.com/@nykolas.z/troubleshooting-dns-over-tls-e7ca570b6337).
Those would be my recommendation to find the issue.
21st May 2020 at 23:31
Thank you for your replay!
21st May 2020 at 23:29
Hi again, I might have found the reason…
After I followed this trouble shooting guide https://medium.com/@nykolas.z/troubleshooting-dns-over-tls-e7ca570b6337
I found out that the DNS over TLS worked inside network.
I ended up setting static IP adresses for my WiFi in my android phones. And pointing the DNS to my Pi-Hole server.
The restarting the phone, and then it seams to work. I’m not sure if the phone uses DNS over TLS when inside my WiFi network or if it uses the Pi-Hole through port 53, but the result is the same. And my main goal of using my Pi-Hole for malware and ad protection while running around in the city is acomplished 🙂
///Peter
11th August 2020 at 11:33
Is there any possible way to configure a proxypass on apache for dns queries? Very useful guide, keep It up!
16th August 2020 at 16:42
There should be, but I haven’t used apache in years. You should be able to find other tutorial for that.
18th January 2021 at 03:33
nginx proxy 853, some domain names cannot resolve the ip value, but the chame value is normal.
14th June 2021 at 07:57
Thank you for this great tutorial!
All worked fine, but stopped on Android private DNS.
Pihole, DNS working fine for computers, VPN clients and so on. Android private dns stopped. I could not find reason.
Testing DNS query got result:
rcode”: GETDNS_RCODE_REFUSED” “status”: GETDNS_RESPSTATUS_NO_NAME
Pihole query log status:
localhost Unknown (0) N/A (0.0ms)
But if I dig on server, or open the same page on my home computer, DNS query works well:
“status”: GETDNS_RESPSTATUS_GOOD
Pihole logs shows OK (cached) IP (0.3ms)
So I can get the DNS names only from the cached pihole records. If Android or DNS test searching new domain name, got error.
I have fully reinstalled pihole, but this not helped.
I dont know is it related, but after turning on “Use DNSSEC” in pihole, even dig not resolving (time out). Earlier worked with turned on this option. This is not neccessary because dnscrypt resolver using DNSSeq, but somehow this related with DOH-TLS problem.
9th September 2021 at 23:37
Should this then enable private dns via Android? getting cannot connect error even though the getdnsapi QUERY appears to work?
1st October 2021 at 02:32
Maybe you can help, since im a little bit clueless as of now. Using https://getdnsapi.net/query/ to query my server works from every browser. I get a response at the end GETDNS_RESPSTATUS_GOOD. In this case, i see also an incoming request on nginx and the response (i have setup logging according to https://nginx.org/en/docs/stream/ngx_stream_log_module.html). Using echo | openssl s_client -connect ‘:853’ | grep -B 2 -A 5 “Certificate chain” returns no issues with the certificate and i could connect. The result is nearby identical as when i use the cleanbrowsing ip.
If i know enter my FQDN in Android, i get the message “No connection possible”. If i look at the basic logfile, i got some requests (with some seconds delay), with bytes send and received always 0. So i think, i receive some requests, but they are empty, but only in case, if i use Android, since the testrequest via https://getdnsapi.net/query/ is not empty.
I have had this setup working before. The only thing, I have changed is a re-install of pihole. I have no idea what i could analyze further to find the issue.
21st October 2021 at 06:22
It appears that Android private DNS uses its own CA certificate trust and that is affected by the Let’s Encrypt root certificate change *.
Change the preferred-chain to “ISRG Root X1”.
Or obtain a non Let’s Encrypt certificate from another supplier, and your Android private DNS is working again within a few seconds.
* https://letsencrypt.org/docs/dst-root-ca-x3-expiration-september-2021/.
23rd October 2021 at 08:46
Darn, then there isn’t much that can be done for old android devices. I should put a disclamer for this.
22nd October 2021 at 23:26
I followed your awesome tutorial and everything appears to work when checking with “kdig -d @mydns.tk +tls-ca google.com” and with getdnsapi.net. However, Android fails. Do you know if Android prevents using dot tk domains?
13th August 2022 at 09:17
Hi Antoine, I managed to use geo-blocking to restrict the DoH queries in the Http section of the Nginx server. However, I have not found a similar way to geo-block the DoT queries in the Streams section. Any suggestion?
1st October 2022 at 17:14
I switch to Adguard to host my DNS Server, it was easier also to manage it. It comes with DoT and DoH out of the box.
I don’t know how to do geo-locking in Nginx streams.
10th February 2025 at 18:27
Thanks a lot! I set up a DoT server I can access from my smartphone! On the server machine I have a dnscrypt-proxy server, now forwarding to DoT on port 853. Now I can use anonymized dnscrypt-proxy from any device! Thanks!